Developers looking to get into Solana development who already know Rust have a great head start. Rust is an officially supported language for writing onchain programs for the Solana Blockchain. However, several key differences in the language's usage could otherwise be confusing.
This guide will walk through several of those differences, specifically the setup details, restrictions, macro changes, and compute limits. Additionally, this guide will cover the development environments and frameworks needed to start with Solana.
By the end of this guide, Rust developers will understand the differences they need to know to start their Solana journeys.
Understanding the Core Differences #
First, note that this guide aims at understanding the differences in using Rust as a language when working with Solana. It won’t cover Blockchain or Solana basics.
It also won’t cover core Solana concepts that must be understood in order to program in Solana, such as:
- Programs - Solana’s version of smart contracts
- Accounts - A record in the Solana ledger that either holds data (a data account) or is an executable program
- Various fees - Such as base fee, priority fee, and rent
- Transactions - Interactions with the network that contain instructions, signatures, and more.
For more information on those core concepts, check out the Solana developer documentation.
Let’s now look at the differences in project setup.
Key Setup Details #
Onchain programs for Solana in Rust are still Rust programs at heart. They still
follow the standard Rust project with a /src folder and Cargo.toml file in
the root. That said, there are several key differences.
Project Dependencies #
To get started, the solana-program crate is required for every onchain Solana program written with Rust. This is the base library for all onchain Rust programs. The library defines macros for the required program entrypoint (see below), core data types, logging macros, and more.
Program Entrypoint #
Instead of a main function, Solana programs use the entrypoint! macro. This
symbol is exported and then called by the Solana runtime when the program runs.
The entrypoint macro calls a given function, which must have the following type
signature:
pub fn process_instruction( program_id: &Pubkey, accounts: &[AccountInfo],
instruction_data: &[u8], ) -> ProgramResult {

        //program code goes here

    }
These three parameters are passed to every onchain program:
- The
program_idis the public key of the current program. - The
accountsare all accounts that are required to process the instruction. - The
instruction_datais data specific to that instruction.
Every program must then call the entrypoint! macro on the instruction, as
follows:
entrypoint!(process_instruction);Building and Testing #
After
installing the Solana command-line tools,
projects can be built to target host machines as normal with cargo build.
However, to target the Solana runtime, use cargo build-bpf or
cargo build-spf which will compile the program to the bytecode necessary to
run it on the Solana runtime.
Unit testing can be achieved via cargo test with standard #test attributes.
For more integrated testing, the
solana-program-test crate
provides a local Solana runtime instance which can be used in conjunction with
outside tests sending transactions.
Finally, a full test cluster can be started with the solana-test-validator, installed along with the Solana CLI. This creates a fully featured test cluster on a local machine, which can then deploy programs and run tests.
Understanding Restrictions #
While most standard Rust crates are available in the Solana runtime, and third-party crates are supported as well, there are several limitations. Since the Solana runtime has resource constraints and must run deterministically, here are the differences to be aware of:
Package Limitations #
The following packages are unavailable:
- rand
- std::fs
- std::net
- std::future
- std::process
- std::sync
- std::task
- std::thread
- std::time
The following packages have limited functionality:
- std::hash
- std::os
Rand Dependencies #
Because programs must run deterministically, the rand crate is not available.
Using an additional crate that depends on rand will also cause compile errors.
However, if the crate used simply depends on rand but does not actually
generate random numbers, then it is possible to work around this by adding the
following to the program’s Cargo.toml:
[dependencies]
getrandom = { version = "0.1.14", features = ["dummy"] }
Macro Changes #
Several standard macros have been replaced or have modified behavior to be aware
of. First, the println! has been replaced with the computationally simpler
msg! macro. The msg! macro outputs to the program logs, and it can be used
as follows:
msg!("Your message");
msg!(0_64, 1_64, 2_64);
msg!("Your variable: {:?}", variable);
The panic!, assert!, and any internal panics are also output to the program
logs by default. However, this can be modified with a custom panic handler.
As a better alternative to panic!, error handling should be used:
#[error_code]
pub enum MyErrors {
    CustomError,
}

#[program]
pub mod anchor_error_test {
    use super::*;

    pub fn initialize(ctx: Context<Initialize>) -> Result<()> {
        //panic!("PANIC");
        return Err(MyErrors::CustomError.into());

        Ok(())
    }
}
Compute Budget #
As a Rust developer, efficient computing is nothing new. What may be different is that in Solana, each transaction has a fixed compute budget that it must not surpass. When transactions exceed the compute budget, they are halted and return an error.
Programs can access the number of remaining compute units via the
sol_remaining_compute_units system call, and can log the remaining number of
compute units with sol_log_compute_units.
Learning the Development Environment and Frameworks #
While the Solana CLI and the solana_program crate are all that is needed to
get started, there are a couple of helpful tools which can accelerate learning.
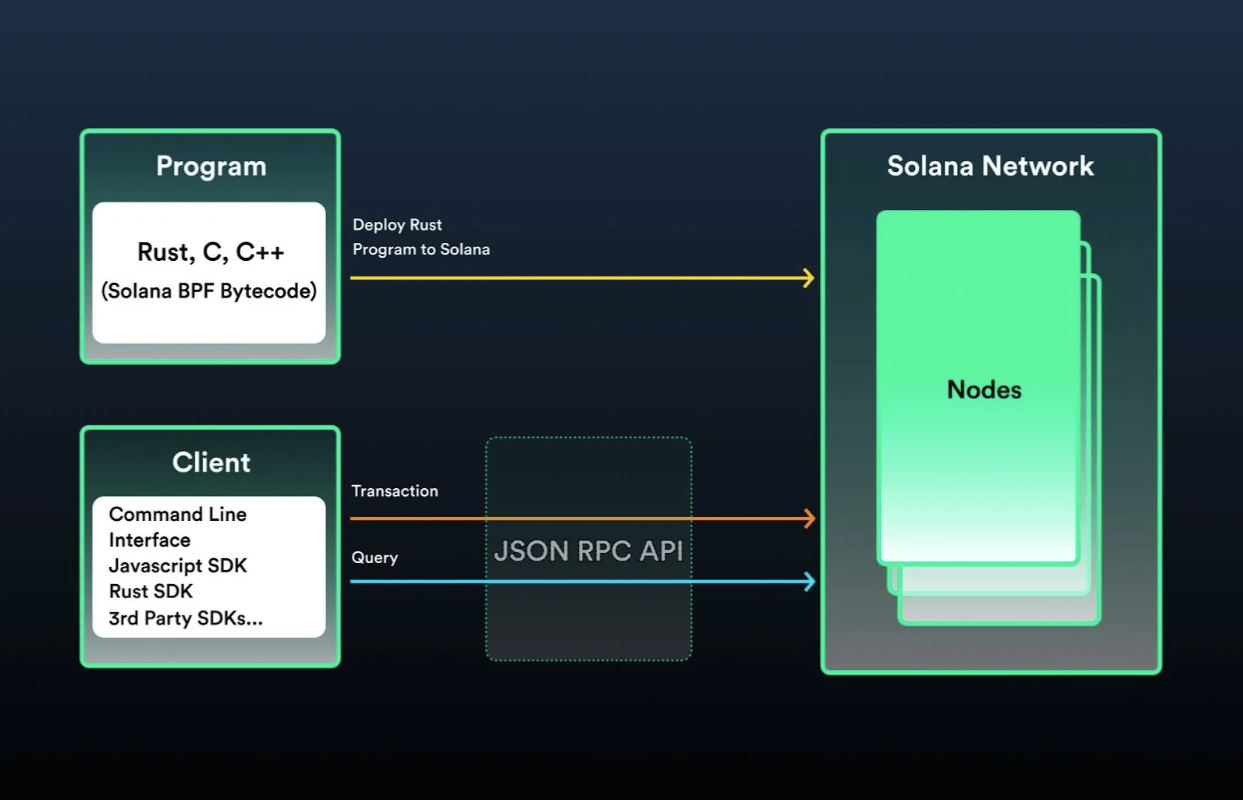
 Network Diagram
Solana Playground #
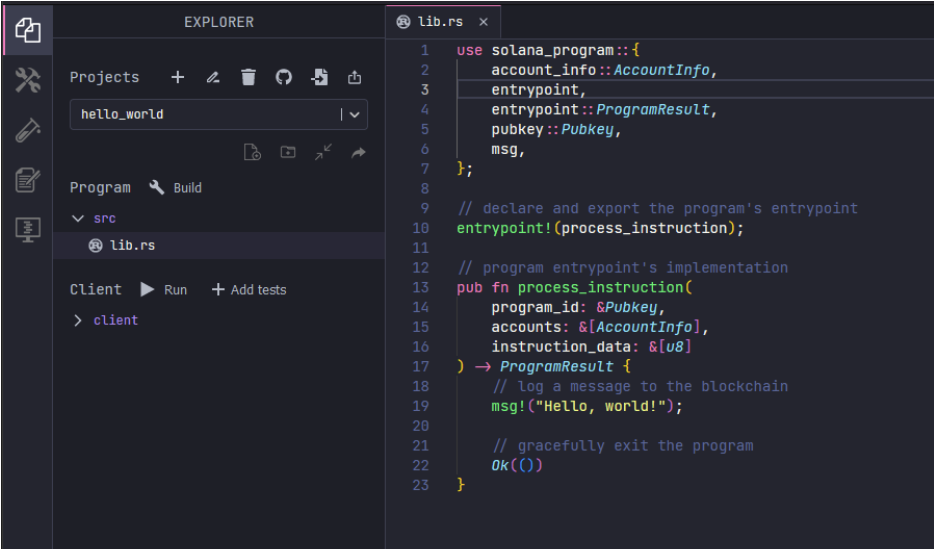
The Solana Playground is a browser-based IDE that allows developers to develop and deploy Solana programs.
 Solana Playground
It’s the easiest way to begin developing with Solana, and it supports building, testing, and deploying Solana Rust programs. Additionally, a number of built-in tutorials are available to guide learning.
The Solana Playground allows developers to get started immediately without setting up a local environment.
Using Anchor #
Anchor is a framework that seeks to accelerate the building of secure Solana programs. It can help by handling standard boilerplate code, speeding up the development cycle. Additionally, it provides some security checks by default, making Solana programs more secure.
To create a new program, simply create a new Anchor project in the Solana playground.
Alternatively,
install the Anchor CLI locally,
and then use anchor init <project-name> to create a new Anchor project.
Creating offchain Programs #
So far, this guide has covered the key details of developing onchain Solana programs in Rust. However, it’s also possible to develop offchain Solana clients in Rust. This can be done by using the solana_sdk crate. This contains the solana_client crate that allows Rust programs to interact with a Solana node via the JSON RPC API.
Another option is to use the anchor_client crate which interacts with Solana programs written in Anchor via RPC. Alternatively, consider writing onchain programs in Rust, and offchain clients in JS/TS.
Wrap Up #
This guide has covered the basics of developing for Solana with Rust, from setup details and restrictions to development environments and frameworks.
For more Rust-related Solana resources, check out the Developing with Rust page.
For other Solana program examples written with Rust, check out these examples on GitHub.
To view several example solana programs, check out the Solana Program Examples on Github.